TABLE OF CONTENTS
- 1. E-Invoicing Setup
- Consolidated Invoices
- Panel Invoices
- Individual Invoices for patients who request E-Invoice
Klinify's new E-Invoicing features will allow users to export their bills and submit them to LHDN's MyInvois portal.
Three different flows are possible: (i) Consolidated Invoice flow, (ii) Panel Invoice flow, and (iii) Individual Invoice flow for patients who requested an E-Invoice.
To get started, there are some initial setup to go through first:
1. E-Invoicing Setup
1a. Fill in your clinic's business details
Head to Settings > Business Details and fill in the required information about your clinic.
1b. Fill in panel company details
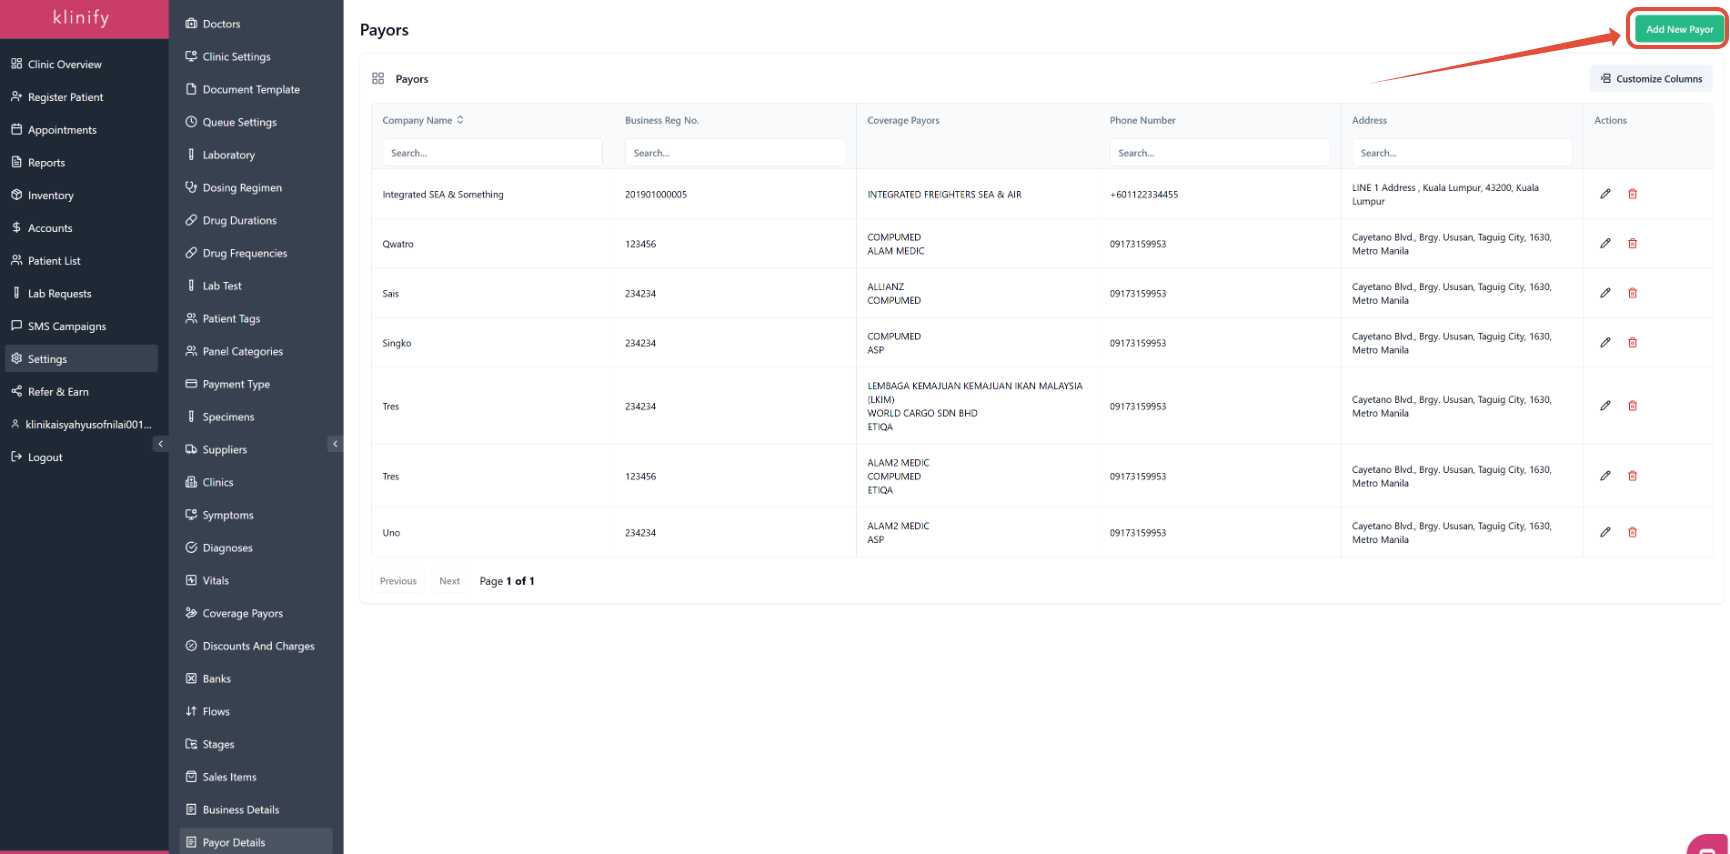
You will need to fill in additional information about panel companies as well. To do so, go to Settings > Payor Details and click Add New Payor at the top right corner.

Fill in the Payor company details as required.

And link the Payor details to the specific Coverage Payor/Panel. You can link multiple coverage payors to one Payor Detail. The Payor information here will be used for the E-Invoicing submission.
1c. Patient Information
When registering patients, please ensure the following:
- Malaysian IC Number should be numbers only, i.e. no hyphens (-) or spaces ( )
- Foreign patients should have their passport number filled in the IC Number field (if individual E-Invoice is required)
- Citizenship/Nationality field must be filled in to ensure SST calculations accuracy
- Telephone number field should follow standard format without hypen (-) or spaces ( ) (i.e. +601234567890)
After setting up, you may proceed to export your bills following the flows below:
Consolidated Invoices
Businesses are required to submit a consolidated invoice before the 7th of each month.
Consolidated Invoices includes all bills that fits the criteria below:
    - Clinic received payment from the patient
    - Bill total amount not completely claimed from panel
    - Patient did not request for individual E-Invoice
To export your consolidated invoice for submission:
- Go to Accounts > E-Invoicing > Consolidated E-Invoice

- Select the correct Invoice Month that you want to export
- Tick all the bills you want included in the consolidated invoice > Export Selected

- A notification will appear informing you that the export is on-going. When it is done, another notification will appear for you to download the file.

- If you missed the download notification, you can go to Accounts > Downloads to retrieve it

- You may double-check the information in the consolidated invoice before submission to the MyInvois portal

- After submission to MyInvois and getting the validation link & invoice with QR code, you can update the status in Klinify by ticking the bills > Validate Selected Invoices

Panel Invoices
To export Panel Invoices for submission:
- Generate the panel claim invoices as usual
- Go to Accounts > Claim Invoices
- Select the correct Invoice Month > Tick the panel invoices you want to export > Export for E-Invoice

- A notification will appear informing you that the export is on-going. When it is done, another notification will appear for you to download the file.

- If you missed the download notification, you can go to Accounts > Downloads to retrieve it

- You may double-check the information in the panel invoice before submission to the MyInvois portal

- After submission to MyInvois and getting the validation link & invoice with QR code, you can update the status in Klinify by ticking the bills > Validate Selected Invoices

Individual Invoices for patients who request E-Invoice
To provide individual invoice for patients who request for it:
- When finalising the bill, tick E-Invoice Requested

- Fill in the required information and finalise the bill

- The patient will appear at Accounts > E-Invoicing > Individual Invoice

- Tick the bills you want to submit and click Export Selected

- A notification will appear informing you that the export is on-going. When it is done, another notification will appear for you to download the file.

- If you missed the download notification, you can go to Accounts > Downloads to retrieve it

- You may double-check the information in the invoices before submission to the MyInvois portal

- After submission to MyInvois and getting the validation links & invoices with QR code, you can update the status in Klinify by clicking Validate for the relevant bills

If you need further assistance, feel free to contact Klinify Chat Support via the ![]() icon.
icon.
Jika anda memerlukan bantuan, sila hubungi Klinify Chat Support melalui ikon ![]() .
.

